Archive for the ‘et voila’


Et Voila Salsa Dinner

salsa-dinner-et-voila.JPG

I used to play the salsa lottery. When you buy salsa in the market, you just never know what you’re going to get. Will it be too hot or too bland? Will the tomatoes be tasty, sweet and organic or mealy and flavorless? Will there be enough onion and cilantro? I like plenty of cilantro. Once you realize how easy it is to make your own salsa, you may never buy it again.

Ingredients:
• At least two fabulous tomatoes, chopped into small pieces. The best are organic heirloom, but they aren’t always available, especially in winter. So in winter I usually buy organic cherry tomatoes, which they even sell in Trader Joe’s, or Italian plum tomatoes. Don’t waste your money buying hot house tomatoes—I’ve yet to find one with any flavor.
• About 1/4 to 1/2 of a medium-sized yellow onion, chopped fine
• A bunch of cilantro, leaves stripped from stems for the most part, and chopped
• 1/2 jalapeno chili, seeds out, minced (you have to taste a tiny bit, see how hot it is, to know how much to add)
• 1/2 one of those smaller, dark green hot chilis, seeds out, minced (ditto, but very, very tiny)*
• 1/2 ripe avocado, cut into small chunks
• salt to taste (shouldn’t need much)

You’ll notice the emphasis on small pieces. That’s so you can get a little bit of everything into each scoop.

Mix all of these things together, get out a corn chip, and taste test. Then you can add more of whatever seems to be needed.

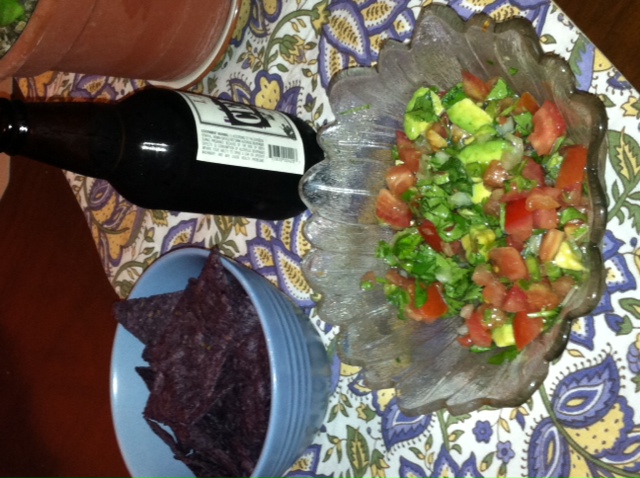
If it’s good to go, pop open a tall one et voila, you have a light and delicious chips and salsa (salad!) dinner.

* Be very careful to wash your hands thoroughly after working with chilis. If you happen to rub your eyes and have chili oil on your hands, it really feels nasty.

PS I don’t know why this program flipped my lovely photo on its side. I’ll try to find someone who can help me fix it.

Et Voila Berry Custard Pie

Sometimes Mondays can be difficult. You’ve had a lovely, relaxing weekend, good times with friends, not a care in the world, and suddenly it’s back to being focused and getting things accomplished. Of course you feel great when you do that, but the process of putting one foot in front of the other and getting the energy moving takes a big push. For that you deserve your just desserts, including this ridiculously easy berry custard pie.

You’ll need:
One frozen unbaked pie crust,* defrosted (look for one that has no hydrogenated fats if possible)
One package vanilla pudding mix, preferably from a natural foods store so it has less sugar and no chemicals
2 regular or 3 small containers fresh blueberries, raspberries, blackberries or combo** (organic if possible, natch)

Follow the directions on the package of pudding. Low-fat milk works fine, and unsweetened coconut milk would probably work fine, too. After the cooking part (which involves just stirring over heat), while it’s chilling and getting more firm, you can put together your pie crust.

Hopefully you’ve taken the pie crust out of the freezer about an hour before you started. If you haven’t, do not microwave! You can always roll the pieces together with a rolling pin if it breaks apart when you unwrap it, and I like to roll it anyway so it’s a little thinner on bottom, a little thicker around the edge. If the pie crust came between two pieces of wax paper, leave the paper on while you gently roll it a couple of times. If no wax paper, lightly sprinkle a breadboard or marble surface (your kitchen counter would also work) with flour. You have mom’s marble rolling pin, and if you chill the actual rolling pin before you roll, it helps it not to stick. Press the edges around the edge of the pie pan. You can make a cute design by pressing the prongs of a fork all around the edge.

When the crust is cool and the pudding is firm, fill the crust, scatter berries on top, et voila! Everybody will want a second slice.

* Homemade pie crust is surprisingly easy too, just takes a little longer. We’ll talk about that another time.

** Berry washing anti-crush hint: Fill a bowl with cool water and drop them in, then gently drain in a colander.

Et Voila Pesto

Basil is the easiest thing in the world to grow, you can even buy a small plant in the grocery store, just needs sun and water. If it starts to bolt (get little flowers on the top) just pinch them off. I like to sprinkle the pinches in the garden in hopes a volunteer will spring up, but so far, hasn’t happened. But whether you grow your own basil or buy it in the produce section, pesto is the perfect summer dinner over pasta, with a salad and warm baguette.

Mix together in a blender or Cuisinart:
• 2 cups of clean basil leaves
• 1/3 cup olive oil
• 3 to 4 peeled* and chopped (!)** cloves of garlic, depending on their size and how garlicky you like it
• 1/3 cup lightly toasted pignoli (pine) nuts***

Blend only as long as necessary. Do not heat.

Cook about half a pound of pasta for two people—read directions on the box and test it at about a minute before they say is enough time. IMHO De Cecco is the best grocery store pasta. I prefer spaghettini, not too thin, not too thick. Cappelini is too thin for this sauce, and spaghetti and linguini are too carby for my taste. Do not rinse the pasta after it cooks, no matter what any well-meaning person tells you.

Drain the pasta and put it on plates. Spoon about a tablespoon of pesto sauce on top (a little goes a long way), sprinkle with parmesan cheese**** and perhaps red pepper flakes (especially for your dad), et voila!

Serve on the porch!

* The best garlic peeler I’ve found is a soft rubber tube. You insert the clove and roll it on the counter, then shake it out et voila, the skin comes off.
** Chopped is important because a blender won’t chop it fine enough and you could end up with big gag-me chunks of garlic in your pasta.
*** Pignoli nuts can be toasted in the toaster oven very briefly, watch closely cause they burn quickly. If you can’t find them at a market near you, you can substitute walnuts or experiment with other nuts. You can also make pesto without nuts, but that added flavor and texture is yummy.
**** Reggiano is the best parmesan cheese, pricier but worth it.

Et Voila Pancakes

Weekend mornings are perfect for sleeping in, taking the dogs for a walk (or a roll in Cedric’s case), and making a big pancake breakfast. Maple syrup is essential in my book,* and this does not mean maple-flavored syrup, so throw out any Aunt Jemima or similar that may be lurking in your cupboard. You want what is known as “real maple syrup,” but that is a misnomer. It’s just “maple syrup,” the other stuff should be labeled “fake maple syrup.” (Is milk “real milk”? Are apples “real apples”? I rest my case.)

Get out your maple syrup (the container should be refrigerated after it’s been opened) and pour some into a small saucepan so it’s all ready to heat up as the pancakes get close to being done.

Also, if you have half of a very ripe banana, you can mash it thoroughly and add it to the batter. You’ll want to add that to the wet ingredients before you combine them with the dry ingredients. Or if you have fresh raspberries or blueberries, wash some (maybe half a cup), dry them thoroughly, and toss them in just before putting the batter in the pan.

Most of the time we prefer thin pancakes that are more like French crepes. The recipe I’ve adapted from The Joy of Cooking (my copy’s covers are off and it is falling apart from repeated use since college) is as follows:

* Sift 3/4 cup flour (I like to use half whole wheat pastry and half white, but you could also experiment with spelt)**
* Resift with 1/8 tsp salt and
1 tsp double-acting baking powder (look for a brand with no aluminum!)

* Beat 2 any-size eggs (preferably free-range, meaning the chickens weren’t cooped up and probably had a happier life)
* Add and beat
2/3 cup any kind of milk
1/3 cup water
1/2 tsp vanilla extract (much better than vanilla “flavor”)

Combine the dry ingredients with the wet ingredients with just a few swift strokes of your whisk, getting out the big lumps. But don’t overstir!

** Turn on the syrup now, on low to medium heat.

Heat a medium nonstick buttered pan (best to use unsalted butter), heat should be moderate, you won’t want the butter browning before you put the batter in. You can test it by sprinkling a few drops of water on the pan, if they bounce it is ready. Pour about 1/4 cup of batter in and swirl it around till it makes a nice big circle. It cooks pretty quickly since it is so thin, so keep an eye on it and flip it over when it starts to turn golden on the bottom.

Serve with plenty of warm syrup.

Et voila! Yummy pancake breakfast!

* If you prefer, you can alternatively make a sauce out of berries mashed with a little water and sugar and heated till it thickens. Or use good quality fruit jam.

** Notes about purchasing flour: Since it is a grain, it can go rancid. Buy any whole grain product in a place where there is good turnover and it’s likely to be fresh. If the health food store, ask them! I keep all my flour in the refrigerator in their paper bags within a plastic bag, so I can just open the top of both bags at once and dig in with my measuring cup.